Contents of This Page

-
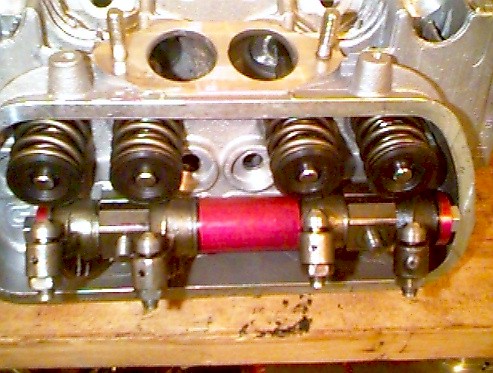
Installing/Setting up Solid Rocker Shafts
  
Assemble the rocker arm/shaft assemblies, using a
combination of shims included in your solid rocker kit and shims from your old set of
rockers. Don't use the spring washers. The stock shims will have warn down to
about .040 inch, whereas the new shims are about .054 inch. Using the combination of
these shims, install your rocker arms and rocker stands so that the rocker arms move
freely but don't have an excessive amount of side play.
How much side play is excessive, you ask? Make sure
the rocker arms can move freely, but there should be no more than .010 inch side play,
preferably around .004 to .006 inch. Many people would probably say that .010 inch
is excessive, but when trying to shim these arms with only the option of two shim
thicknesses, it may be the best you get. After you have installed the rocker
assemblies, you should be able to rotate the center sleeves with your hands, but they
shouldn't have any side play either. Use the same tolerances for the rocker arms for
the center sleeves. One thing to remember, if you have to live with .010 inch
clearance between any of the moving parts, the result will be louder valve train, that is
to be expected.

What are the differences between stock
and aftermarket pushrods?
There are three types of pushrods available, stock
(aluminum), steel, and chromoly. The following is a list of the pros and cons for
each:
- Stock, aluminum pushrods, no good for any significant rpms or
dual valve springs. Good for mostly stock applications.
- Steel pushrods, better than aluminum, but are heavy and aren't
as strong as chromoly. These produce a lot of valve noise.
- Chromoly pushrods, the best available in terms of strength,
but also produce a lot of valve noise. These are also the most expensive, but only
$40 as compared to $30. In my opinion, if you are going to have to live with loud
valves, you may as well pay an extra $10 for it :-). In all seriousness, if you are
going to spin some pretty high rpms, $10 is cheap insurance.
Should I buy stock length or cut to length pushrods?
- If you are building a stroker that will require cylinder
spacers or shims, buy the chromoly cut to length pushrods that are 11.6 inches long, not
11.06 inches long. I screwed this up by doing the following: 1) I bought the 11.06
inch pushrods 2) Measured my pushrods with the KYMCO adjustable pushrod 3) I realized that
the adjustable pushrod was longer than my chromoly pushrods without being cut. So,
thinking that these were the longest available (due to my disslecsia (sp?) seeing 11.06
inches instead of 11.6 inches), I assembled 4 of the pushrods. 4) Checked my rocker
geometry only to find that there was no way I could make these pushrods work and have
proper geometry. 5) Now, I have the proper 11.6 inch pushrods, and could have saved myself
$40 if I had just purchased the longest ones to begin with.
- If you are building a standard stroke engine or a stroker that
doesn't need spacers/shims, you can probably get away with stock length pushrods.
Measure the required length using the following procedure.
- If you have a stock stroke engine with seriously flycut heads,
etc., you may need to purchase cut to length pushrods to cut pushrods shorter than stock.
Checking the Rocker Arm Geometry
- Assumptions:
- As a rule, you can measure one pushrod to determine the length
for all pushrods if you have all new lifters or your rebuilt lifters have cam lobe pads
that are all the same thickness. Also, I'll assume that there are no drastic
differences between the cylinder spacing on the 1-2 side as with the 3-4 side. For
the sake of these procedures, we'll also assume that you are checking the pushrod length
at cylinder 3.
Recommendation before starting this procedure: - Remove the rings from your pistons while doing these checks.
This makes it so things aren't so messy, you won't have to use oil to lubricate the
piston, cylinder, and rings, and it reduces wear in the cylinders.
- Install the pistons, cylinders, and head, and torque the head
down
- Increase the length of the adjustable pushrod to 11 inches and
install it and an old pushrod into the intake and exhaust valves of cylinder
#3. The old pushrod is only there as a reference so you can watch it move as we try and
locate Top Dead Center (TDC) for cylinder #3.
- Install the rocker assembly and torque it to specs.
- Rotate the crankshaft clockwise until your pulley is at TDC.
If, as you rotate the crankshaft up to TDC, you see the pushrods swap positions,
meaning that the intake pushrod was up and as it came down the exhaust pushrod started to
go up, that means that cylinder #3s valves are in overlap, or in other words, it is a full
revolution from being at TDC. Rotate the engine 360 degrees, and cylinder #3 will be at
TDC. The easiest way to tell if the valves are in overlap, is to rotate the pulley
20 degrees before and after TDC, and if they are in overlap, the pushrods will swap
positions. If it is truly at TDC, the pushrods won't move.
- Once you have found TDC for cylinder #3, adjust the valve with
a clearance of .004 or .006, using a feeler gauge, whichever your cam
manufacturer recommends (only adjust the valve clearance of the valve with the adjustable
pushrod).
- Using the precision of your retina and a dial caliper, eyeball
the movement of your rocker arm (if you have a dial indicator that you can mount to the
head, it would be much more accurate than the eyeball method). Using the dial caliper, or
dial indicator if you have one, measure when your cam is at half lift. What you are
looking for is, when your cam is at half lift, your rocker arm should be parallel with the
valve cover mounting surface. This ensures that you don't have a tremendous load on
your valve adjusters and valve guides, and also that you won't have valve spring coil
bind.
Note: If your
rocker arm geometry is set so that your rocker arms are parallel when your cam is at full
lift, you need to add shims under your rocker assembly and possibly lengthen your
pushrods. This scenario puts additional stress on your valve adjusters, and will
cause premature wear of your valve guides. If your rocker arm geometry is set so
that your rocker arms are beyond parallel at half lift of the cam, this can cause valve
spring coil bind. The only way to fix this problem is to shorten your pushrods.
- Based on the information in the previous notes, make
adjustments to fit your situation. Once you have set your geometry so that it is
parallel at half lift, make sure that your valve adjusters are backed out as far as
possible, this will give you maximum adjustability later on in the engines life, but make
sure that there is still plenty of the adjuster sticking through the rocker arm so that
you won't have any interference of the rocker arm with the valve retainer, etc.
Backing out the adjusters may require you to lengthen your adjustable pushrod.
- Conclusion:
- By making sure that the geometry is set properly, using shims,
backing out the adjusters, and adjusting the length of your pushrod, you have also
established the required length of your pushrods. Remove the rocker assembly and
measure the length of the adjustable pushrod, you now have the exact length required for
your pushrods.
-
- After I performed all of the previous steps, I proceeded to
verify this measurement with a couple other valves. After my measurements, I
realized that I could make all of my pushrods the same length, and that the valve
adjusters would take up the small amount of variance between the cylinders.
-
-
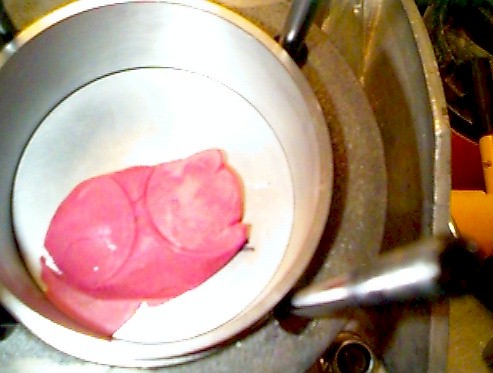
Checking Valve to Piston Clearance
- Prelude: Usually I wouldn't check this, but
since I am running relatively high lift (.468 inches) as well as large valves, I wanted to
make sure. Also, I will be installing 1.25:1 ratio rockers on this engine sometime
during this season, and I wanted to make sure that I had plenty of clearance. With
1.25:1 rockers, my Engle W130 will have .532 inches of lift, so I had to make sure that I
had at least .064 inches of clearance. After removing the head and measuring the
clay, I realized that I had over .200 inches of clearance, it was definately worth the
peace of mind.
-
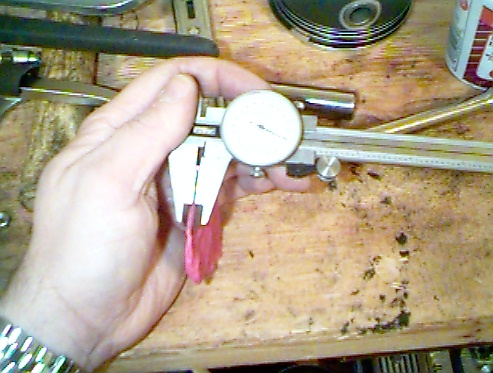
- Procedure: You can check this by putting some
modeling clay on the top of the piston before you assemble the cylinders. After you
set your geometry and pushrod length, rotate the engine through 4 or so revolutions, this
will compress the valves against the clay on the top of the piston. After you remove
the cylinder head, you can measure the thickness of the clay to determine if there are any
clearance problems between the valves and the piston. In the following pictures, you can
see what the clay looks like after being compressed by the valves, and you can also see
that I stuck the depth gauge of my dial caliper into the thinnest part of the clay to
determine the minimum valve-to piston-clearance.
 
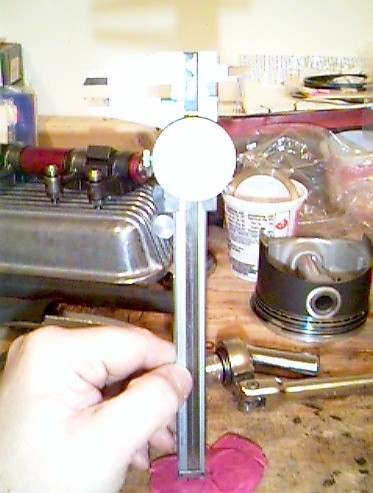
- In the picture below, you can see that I am measuring the deck
height by measuring the flat spot on the modelling clay. Sure enough it was .060
inch, which was exactly what I calculated. Make sure you don't make this measurment
where the valves compressed the clay, that is for valve-to-piston clearance.

-
-
-
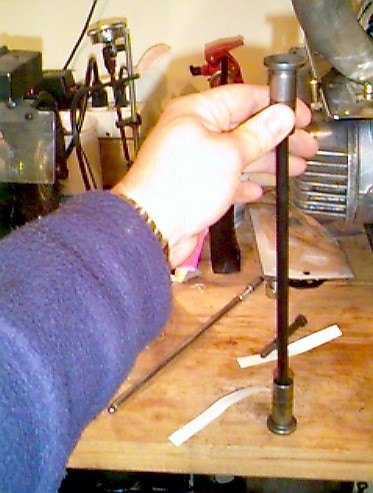
Cutting and Assembling the Pushrods
- Once you have determined the length of the pushrods, use a
pipe/tubing cutter to cut the pushrods to the measured length (remember to calculate the
length of the end into the total pushrod length before cutting the pushrod). After the
pushrods have been cut, use two used/old lifters to press the end into the blank end of
the pushrod. Set one lifter on a solid surface, garage floor works great, then press
the new pushrod end into the blank end of the pushrod with your hand until it stays.
Carefully place the other lifter on top of the new pushrod end, and hammer the
lifter until the new end is firmly seated into the pushrod. Refer to the following
image:

|